Xamarin.Forms XamlのGrid・BindingとDependencyServiceの説明
Xamarin.Formsの各OS毎の機能の呼び出し方の説明
WEBブラウザ起動を例として記載します。
-XamlのGridの説明
-XamlのBindingの説明
-DependencyServiceの説明
空のプロジェクト作成
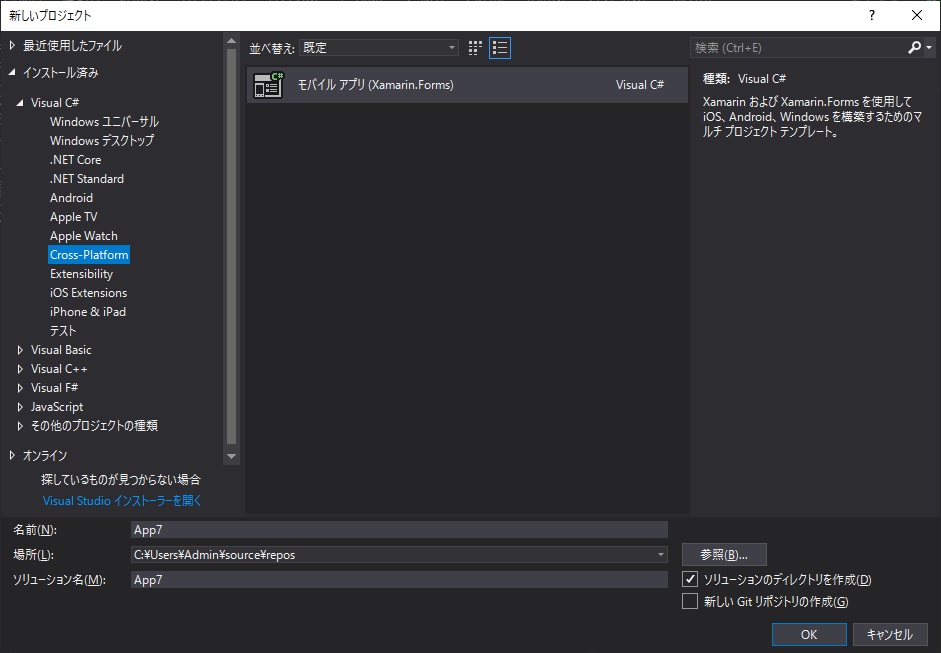
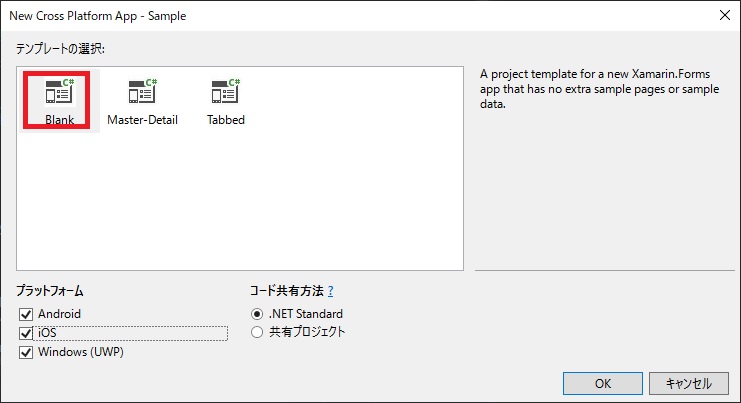
空のプロジェクトを作成してください。
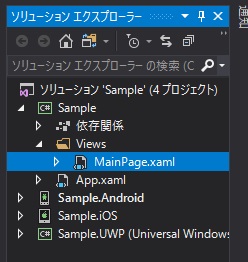
フォルダ"Views"を作成してMainPage.xamlを格納してください。
Gridについて
MainPage.xamlのUIを変更しましょう。xamlはザムルと読みます。下記の内容に書き換えてください。
MainPage.xaml
<?xml version="1.0" encoding="utf-8" ?>
<ContentPage xmlns="http://xamarin.com/schemas/2014/forms"
             xmlns:x="http://schemas.microsoft.com/winfx/2009/xaml"
             x:Class="Sample.MainPage">

    <!-- 行3列2のマトリクス -->
    <Grid>

        <!-- 数字が固定長、Autoが必要最低、*があまり全部 -->
        <!-- ここでは列2個-->
        <Grid.ColumnDefinitions>
            <ColumnDefinition Width="*" />
            <ColumnDefinition Width="*" />
        </Grid.ColumnDefinitions>

        <!-- 数字が固定長、Autoが必要最低、*があまり全部 -->
        <!-- ここでは行3個-->
        <Grid.RowDefinitions>
            <RowDefinition Height="Auto" />
            <RowDefinition Height="50" />
            <RowDefinition Height="Auto" />
        </Grid.RowDefinitions>

        <!-- Grid.Column、Grid.Rowで座標指定 座標指定だから順番は自由-->
        <StackLayout Grid.Row="0" Grid.ColumnSpan="2" Orientation="Horizontal" HorizontalOptions="Center" VerticalOptions="Center">
            <Entry Placeholder="URIを入力してください" />
        </StackLayout>
        <Button Grid.Column="1" Grid.Row="1" Text="URIを開く:Device.OpenUri" />
        <Button Grid.Column="0" Grid.Row="2" Text="URIを開く:DependencyService" />

    </Grid>
</ContentPage>
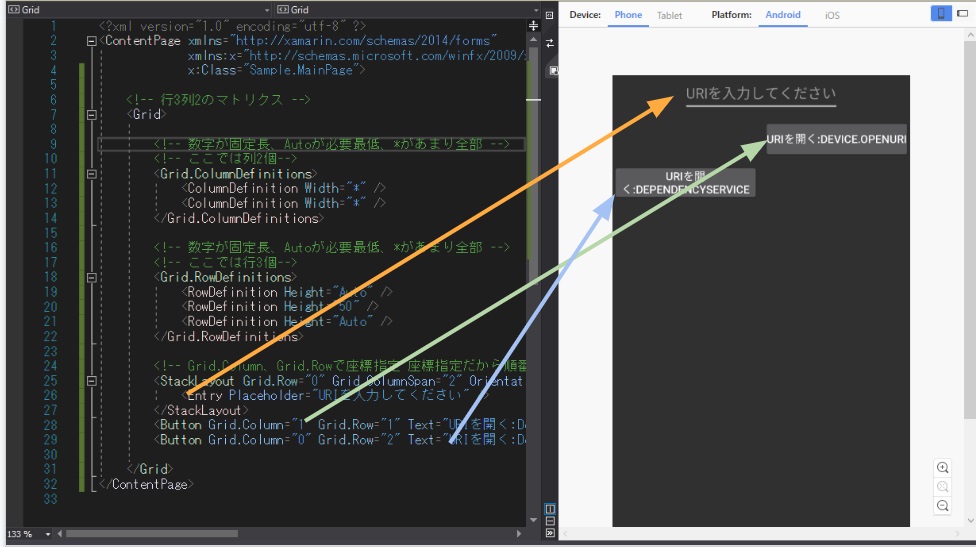
そうすると下記のようになります。
サンプルのGridは列が2個、行が3個です。インデックスは0スタート。1行目は2列の結合、2行目は2列目、3行目は1列目に描写としています。
Device.OpenUri(Uri) Method
28行目の要素に「Clicked=」を手打ちで書き加えてください。 すると「新しいイベントハンドラ」とガイドが出てきますので押下してください。
<Button Grid.Column="1" Grid.Row="1" Text="URIを開く:Device.OpenUri" Clicked="Button_Clicked"/>
MainPage.xaml.csを開いてみましょう。
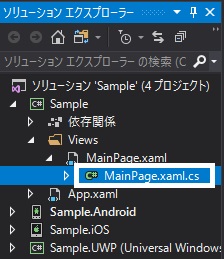
イベントハンドラ「Button_Clicked」が追加されているはずです。
private void Button_Clicked(object sender, EventArgs e)
{

 }
ここに処理を書いてみましょう。
private void Button_Clicked(object sender, EventArgs e)
{
    Device.OpenUri(new Uri(@"https://www.google.com/"));
}
これで実行して、"URIを開く:Device.OpenUri"のボタンを押下してください。WEBブラウザが起動するはずです。
AndroidとUWPなど異なる環境間で同じ動きであることを確認してください。
WEBブラウザを開くというOSの機能の呼び出しですが、URIを開くことだけは下記の関数が用意されています。 docs.microsoft.com
しかし、ほかの動作は現状共通ロジックがXamarin.Forms側で用意されているわけではありません。そこで、次は各OSの機能を各OS毎に定義して呼び出す方法に触れたいと思います。
DependencyService インターフェース部
DependencyService というものがあります。
実際に書いていきたいと思います。.Net StandardのプロジェクトにフォルダServicesを追加しましょう。
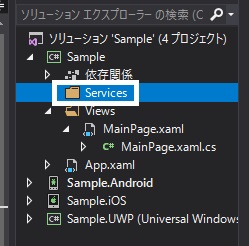
Servicesの中にインターフェースIOpenUriServiceを作成しましょう。
IOpenUriService.cs
namespace Sample.Services
{
    public interface IOpenUriService
    {
        void OpenUri(string uri);
    }
}
MainPage.xamlの29行目の要素に「Clicked=」を手打ちで書き加えてください。 すると「新しいイベントハンドラ」とガイドが出てきますので押下してください。
MainPage.xaml.csに新しいイベントハンドラが増えているのでそれを下記のように編集しましょう。
private void Button_Clicked_1(object sender, EventArgs e)
{
    var openUriService = DependencyService.Get<IOpenUriService>();
    openUriService.OpenUri(@"https://www.google.com/");
}
これで”ボタンを押すとインターフェイスIOpenUriServiceのOpenUri(string)を呼び出す”という指示をライブラリに与えることができました。
下図の青で囲った部分の実行プロジェクトのほうに実装を書きましょう。
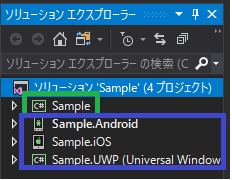
DependencyService 実装部 Android
AndroidのプロジェクトにフォルダSevicesを追加しましょう。
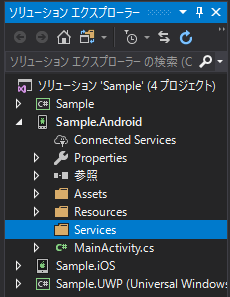
Services配下にクラスOpenUriServiceを追加します。
OpenUriService.cs
using Android.Content;
using Android.Net;
using Sample.Droid.Services;
using Sample.Services;
using Xamarin.Forms;

[assembly: Dependency(typeof(OpenUriService))]
namespace Sample.Droid.Services
{
    class OpenUriService : IOpenUriService
    {
        public void OpenUri(string strUri)
        {
            Uri uri = Uri.Parse(strUri);
            Intent intent = new Intent(Intent.ActionView, uri);
            Android.App.Application.Context.StartActivity(intent);
        }
    }
}
ここまで出来たらAndroidで実行してみてください。 "URIを開く:DependencyService"ボタン押下でブラウザが起動すれば成功です。
DependencyService 実装部 UWP Windows
UWPのプロジェクトにフォルダSevicesを追加しましょう。
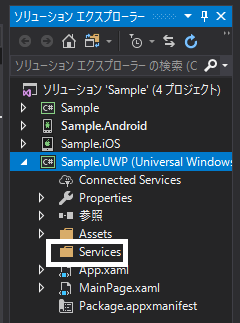
Services配下にクラスOpenUriServiceを追加します。
OpenUriService.cs
using Sample.Services;
using Sample.UWP.Services;
using System;
using Windows.System;
using Xamarin.Forms;

[assembly: Dependency(typeof(OpenUriService))]
namespace Sample.UWP.Services
{
    class OpenUriService : IOpenUriService
    {
        public void OpenUri(string strUri)
        {
            Uri uri = new Uri(strUri);
            var wb = Launcher.LaunchUriAsync(uri);
        }
    }
}
ここまで出来たらWindowsで実行してみてください。 "URIを開く:DependencyService"ボタン押下でブラウザが起動すれば成功です。
MVVM Bindig コマンド
MVVMというものがあります。Xamarin.FormsというかXamlを使うものはMVVMパターンで書くものであるそうです。
 Model View ViewModel - Wikipedia
MVVMでいうと現時点のサンプルはViewであるMainPage.xaml.csに直接ロジックを書いていてパターンに沿っていません。
MVVMパターンに書き換えてみましょう。WEB上の記事を見ればModelでもINotifyPropertyChangedを実装してしまうのはOKは風潮を感じるのでここでは単純化のためにViewModelとModelを同じものとして扱います。
MainPage.xamlのボタンを書き換えます。ボタンのClicked属性をCommand属性に書き換えてください。
<Button Grid.Column="1" Grid.Row="1" Text="URIを開く:Device.OpenUri" Command="{Binding DeviceOpenUriCommand}"/>
<Button Grid.Column="0" Grid.Row="2" Text="URIを開く:DependencyService" Command="{Binding DependencyServiceCommand}"/>
いらなくなったイベントハンドラはコメントアウトしておきましょう。
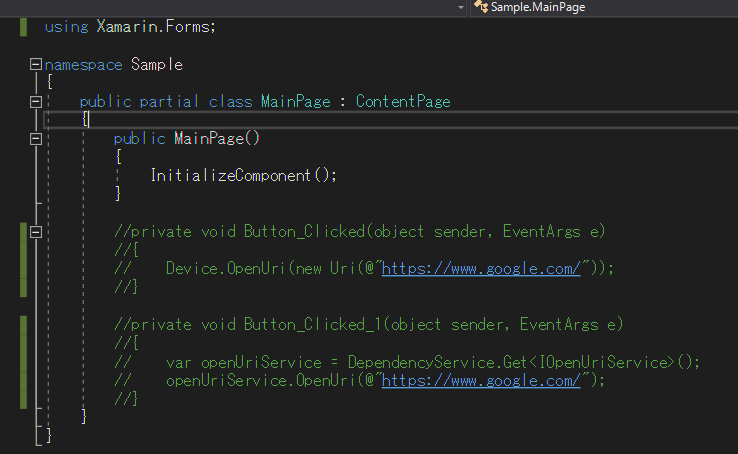
ライブラリのプロジェクトにフォルダViewModelsを作ってください。
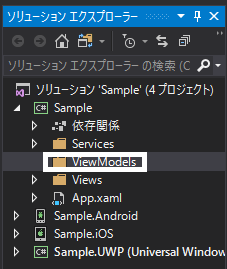
作成したフォルダViewModelsの中にクラスBaseViewModelを作成してください。
using System;
using System.Collections.Generic;
using System.ComponentModel;
using System.Runtime.CompilerServices;

namespace Sample.ViewModels
{
    class BaseViewModel : INotifyPropertyChanged
    {
        protected bool SetProperty<T>(ref T backingStore, T value,
    [CallerMemberName]string propertyName = "",
    Action onChanged = null)
        {
            if (EqualityComparer<T>.Default.Equals(backingStore, value))
                return false;

            backingStore = value;
            onChanged?.Invoke();
            OnPropertyChanged(propertyName);
            return true;
        }

        #region INotifyPropertyChanged
        public event PropertyChangedEventHandler PropertyChanged;
        protected void OnPropertyChanged([CallerMemberName] string propertyName = "")
        {
            var changed = PropertyChanged;
            if (changed == null)
                return;

            changed.Invoke(this, new PropertyChangedEventArgs(propertyName));
        }
        #endregion
    }
}
フォルダViewModelsの中にクラスMainPageViewModelを作成してください。
using Sample.Services;
using System;
using System.Windows.Input;
using Xamarin.Forms;

namespace Sample.ViewModels
{
    class MainPageViewModel : BaseViewModel
    {
        public ICommand DeviceOpenUriCommand => new Command(() => Device.OpenUri(new Uri(@"https://www.google.com/")));
        public ICommand DependencyServiceCommand => new Command(() =>
        {
            var openUriService = DependencyService.Get<IOpenUriService>();
            openUriService.OpenUri(@"https://www.google.com/");
        });
    }
}
作成したVIewModelをViewで参照します。
MainPage.cs
using Sample.ViewModels;
using Xamarin.Forms;

namespace Sample
{
    public partial class MainPage : ContentPage
    {
        public MainPage()
        {
            InitializeComponent();

            //ここでViewはViewModelを参照します
            BindingContext = new MainPageViewModel();
        }

        //private void Button_Clicked(object sender, EventArgs e)
        //{
        //    Device.OpenUri(new Uri(@"https://www.google.com/"));
        //}

        //private void Button_Clicked_1(object sender, EventArgs e)
        //{
        //    var openUriService = DependencyService.Get<IOpenUriService>();
        //    openUriService.OpenUri(@"https://www.google.com/");
        //}
    }
}
これでViewModelにロジックを記載できるようになりました。実際に動かしてみましょう。
MVVM Bindig コマンド以外
コントロールの状態(テキストやSwitchの状態など)をViewModel側で受け取ってみましょう。
Entry(テキストボックス)を画面に追加しましょう。そして、Entryに入力されたURIにブラウザで接続できるようにしましょう。
ADDとコメントで書かれている箇所が追記箇所です。
MainPage.xaml
<?xml version="1.0" encoding="utf-8" ?>
<ContentPage xmlns="http://xamarin.com/schemas/2014/forms"
             xmlns:x="http://schemas.microsoft.com/winfx/2009/xaml"
             x:Class="Sample.MainPage">

    <!-- 行3列2のマトリクス -->
    <Grid>

        <!-- 数字が固定長、Autoが必要最低、*があまり全部 -->
        <!-- ここでは列2個-->
        <Grid.ColumnDefinitions>
            <ColumnDefinition Width="*" />
            <ColumnDefinition Width="*" />
        </Grid.ColumnDefinitions>

        <!-- 数字が固定長、Autoが必要最低、*があまり全部 -->
        <!-- ここでは行3個-->
        <Grid.RowDefinitions>
            <RowDefinition Height="Auto" />
            <RowDefinition Height="50" />
            <RowDefinition Height="Auto" />
            <!-- ADD Start -->
            <RowDefinition Height="Auto" />
            <!-- ADD End -->
        </Grid.RowDefinitions>

        <!-- Grid.Column、Grid.Rowで座標指定 座標指定だから順番は自由-->
        <StackLayout Grid.Row="0" Grid.ColumnSpan="2" Orientation="Horizontal" HorizontalOptions="Center" VerticalOptions="Center">
            <Entry Placeholder="URIを入力してください" />
        </StackLayout>
        <Button Grid.Column="1" Grid.Row="1" Text="URIを開く:Device.OpenUri" Command="DeviceOpenUriCommand"/>
        <Button Grid.Column="0" Grid.Row="2" Text="URIを開く:DependencyService" Command="DependencyServiceCommand"/>

        <!-- ADD Start -->
        <Entry Grid.Row="3" Grid.ColumnSpan="2" Placeholder="URLを入力してください" Text="{Binding URIText}" />
        <!-- ADD End -->

    </Grid>
</ContentPage>
Text="{Binding URIText}"と属性が書かれています。この"Binding"というのはTextに限定されず、様々な属性で利用できます。Bindingの対象はstringやintなどのプリミティブなものだけではなく、クラスなども利用できます。
次に、書き換えたXAMLに合わせてVIewModelを書き換えます。
MainPageViewModel.cs
using Sample.Services;
using System;
using System.Windows.Input;
using Xamarin.Forms;

namespace Sample.ViewModels
{
    class MainPageViewModel : BaseViewModel
    {
        //ADD Start
        private string uRIText;

        public string URIText
        {
            get { return uRIText; }
            set { SetProperty(ref uRIText, value); }
        }
        //ADD End

        //MOD Start
        //public ICommand DeviceOpenUriCommand => new Command(() => Device.OpenUri(new Uri(@"https://www.google.com/")));

        //public ICommand DependencyServiceCommand => new Command(() =>
        //{
        //    var openUriService = DependencyService.Get<IOpenUriService>();
        //    openUriService.OpenUri(@"https://www.google.com/");
        //});

        public ICommand DeviceOpenUriCommand => new Command(() => Device.OpenUri(new Uri(URIText)));

        public ICommand DependencyServiceCommand => new Command(() =>
        {
            var openUriService = DependencyService.Get<IOpenUriService>();
            openUriService.OpenUri(URIText);
        });
        //MOD End
    }
}
これで実行してみましょう。Viewの内容がViewModelに連携されることがわかります。これでVIewからロジックを取り除くことができました。
これがViewにViewModelがパラメータの形で保有している値をバィンディングしている例となります。
最後に
つたなくて申し訳ないのですが、一応これでXamarin.Formsの”異なるOSでの処理実装”と"データバィンディング"に触れられたと思います。
実際にアプリを作るとユーザーの操作関係なしに処理側でViewからViewModelやViewModelからViewにイベントを通知したい場面があると思います。そういう場面では下記のようなものを利用します。
そのうち、触れられたらと思います。では